In this blog, I will introduce how to do AI coding using Chat-GPT and the RL78 Arduino-compatible board, along with its practical examples.
Chat-GPT is an AI tool developed by OpenAI that can understand user input text or questions based on pre-trained text information and produce answers. However, it doesn’t always generate accurate content, so users need to be aware of this when using it.
Arduino is an open-source platform for easily conducting electronic projects. It consists of a board equipped with a microcontroller (Arduino board) and a software development environment (Arduino IDE). As of September ‘23, with RL78 products, software can be developed for the following boards using the Arduino IDE.
Information for supporting boards:
Home · renesas/Arduino Wiki · GitHub
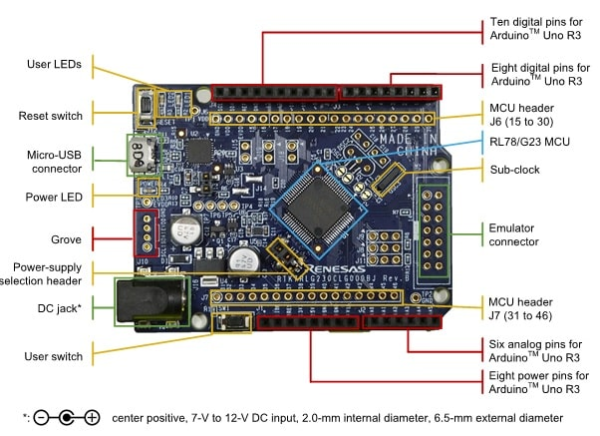
For this demonstration, I used the RL78/G23-64p Fast Prototyping Board to generate a program with Chat-GPT that blinks an LED. I will explain the actual process from Step 1 to Step 5.
Prepare the RL78/G23-64p Fast Prototyping Board (RL78/G23-64p FPB). Connect the board to your PC using a Micro USB Type-B cable.

Install the Arduino IDE on your PC. After installation, install the package for RL78/G23-64p FPB from the board manager.
Install Gude:
Quick Start Guide · renesas/Arduino Wiki · GitHub
For the program we’re creating, we’ll use the onboard LED (User LEDs).

Use the information from the link below to input the LED pin information and control signal information into Chat-GPT.
Reference for PIN information:
RL78G23 64pin Fast Prototyping Board · renesas/Arduino Wiki · GitHub
| Example of input prompt: |
|---|
| Arduino Board Specifications: The board features two LEDs (LED1, LED2). The LEDs are pulled up with resistors, and the cathode side is connected to the pin. Name pin memo LED1 16 – LED2 15 – |
I requested Chat-GPT to write a program that blinks LED1 and LED2 every second.
| Example of input prompt: |
|---|
| Software Specifications: LED1 and LED2 should toggle ON and OFF every second. The initial state of LED1 is ON, and the initial state of LED2 is OFF. |
Create a new sketch in the Arduino IDE, copy & paste the program output by Chat-GPT, then run Verify and Upload.
For detailed operation and execution procedures of Arduino IDE, please refer to:
Quick Start Guide · renesas/Arduino Wiki · GitHub
Home · renesas/Arduino Wiki · GitHub
This time, the program was output as expected in both gpt-3.5 and gpt-4. If the program doesn’t operate as expected, request a revision from Chat-GPT. Make an effort to input concise and clear information. Moreover, there’s a tendency for gpt-4 to produce more expected results than gpt-3.5.

Although the theme was simple this time, I succeeded to generate the targeted code using Chat-GPT. I would like to challenge even more advanced themes in the future. For those of you who are interested, why not try AI coding for yourself?
| Full text of Input Prompt to Chat-GPT: |
|---|
| Request for Arduino Program Creation Arduino Board Specifications: The board features two LEDs (LED1, LED2). The LEDs are pulled up with resistors, and the cathode side is connected to the pin. Name pin memo LED1 16 – LED2 15 – Software Specifications: |
General caution for ChatGPT generated codes:
Before utilize generated codes, certain screening processes would be recommended because those codes may possibly infringe third-party intellectual property rights or contain malware fragments as well as deriving other unwanted outcomes.